Using DD-WRT in Repeater Mode
I bought my mother an Opal travel router so that she could have a private network in her apartment, separate from the public building-wide wi-fi network. This would improve security and prevent other people from seeing her devices on the network, including her printer. The Opal has a Repeater mode that is easy to set up, it and worked fine for a while. But the Opal turned out to be unreliable, crashing at unpredictable times, so I decided to see if I could replace it with an old Linksys WRT54GL router running DD-WRT.
Preliminaries
The Linking Routers article on the DD-WRT Wiki describes the various options. Several of the options require linking two routers with ethernet cables, but that option was not available to me, since I had no access to the host router. Repeater Bridge and Repeater connect the two routers using wi-fi, but I couldn’t use Repeater Bridge because it puts the clients of both routers on the same network, the exact situation I was trying to avoid. That left Repeater mode.

As a starting point, I used the Wlan Repeater article. The instructions there are good, but there were a few details that were missing, or that turned out to be unnecessary or misleading.
First, it should be noted that the Linksys WRT54GL
router (version 1.1) that I used has a Broadcom wireless chip set,
which is a good thing, because the Wlan Repeater article said that Atheros chip sets
don’t support Repeater mode. I had already installed DD-WRT
version V3.0-r44715 std (11/03/20) a few years ago, and fortunately this version supports Repeater mode.
(To find this version of the firmware, visit the
Router Database, and enter
wrt54gl in the search box.)
DD-WRT Configuration
For completeness, below is the procedure I used, copied from the Wlan Repater article and edited slightly.
- It was not necessary to do a hard reset. The 30-30-30 procedure mentioned in a few places in the DD-WRT Wiki is non-sensical and can harm some routers. Instead, it’s only necessary to do a factory reset from the DD-WRT GUI, at Administration Factory Defaults. After you do a factory reset, you will be prompted to set a user name and password.
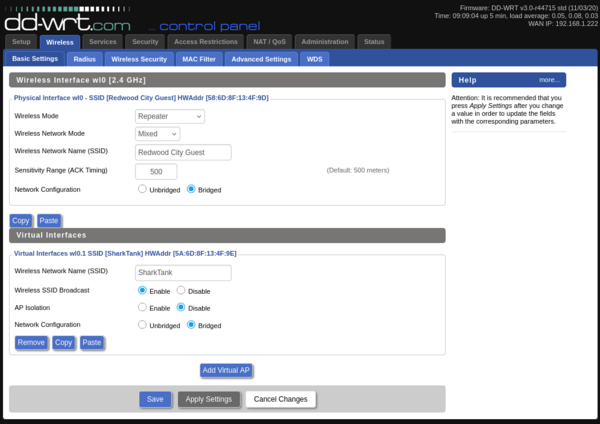
Under Wireless Basic Settings:
Physical interface
wl0:- Wireless mode: Repeater
- Wireless Network Mode: mixed
- Wireless Network Name (SSID): match the host (
Redwood City Guestin my case) - Save (very important to do this before the next step!)
Virtual interface
wl0.1:- Add one virtual interface
- Wireless mode: AP
- Wireless Network Name (SSID): unique SSID of your choice (
SharkTankin my case) - Save
When done, it should look like this:
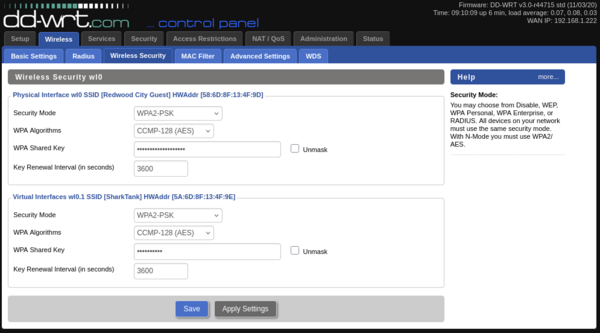
Under Wireless Wireless Security:
Physical Interface
wl0:- Security mode: match the host (WPA2-PSK in my case)
- WPA Shared Key: match the host
- Save
Virtual Interface
wl0.1:- The article says to use WPA2-AES, but I used WPA2-PSK
- WPA Shared Key: enter your unique key
- The article says to make the keys for
wl0andwl0.1the same, but I found this wasn’t necessary - Save
When done, it should look like this:
Under Setup Basic Setup:
Network Setup:
Here you define the repeater’s own subnet. Set Local IP address to a different subnet from the Host AP you wish to repeat. For example, if host AP is 192.168.1.x, set your Local IP Address repeater to 192.168.2.1. Set up your DHCP range if you desire.
Save
When done, it should look like this:
(Optional but recommended) Under Security:
- Uncheck all items in the “Block WAN Request” section (except Filter Multicast)….THEN disable the SPI firewall
- Note: If you are very concerned about security, a Repeater might still work okay with the SPI firewall enabled. If you decide to leave it enabled but experience problems, keep this step in mind.
- Save
- When done, it should look like this:
- Uncheck all items in the “Block WAN Request” section (except Filter Multicast)….THEN disable the SPI firewall
- Recheck each tab and section to ensure that your settings are correct. Then click Apply Settings to write changes. If you changed the subnet address in step 4, you will probably need to disconnect and then reconnect your computer to the router.
Testing
One feature of Repeater mode is that client computers can connect to DD-WRT using ethernet, not just wi-fi. This was surprising, because in various places in the DD-WRI wiki it was hinted that only wireless clients might be supported by modes that connect two routers. So the following tests should be run using clients connected by both wi-fi and ethernet:
- Ping:
ping 8.8.8.8 - DNS:
dig www.example.com - Web:
xdg-open https://www.example.com
Finally, I ran this speed test, and the results were decent when connected via ethernet, with a slowdown of about 20% compared with a direct connection to the host router. Connection with wi-fi was worse, about half the speed of a direct connection. These results are not surprising, given the fact that the router I used is 20 years old. (According to Wikipedia, this is the best-selling router of all time.) In a way, this demonstrates the value of Linux in keeping old hardware alive, in contrast to the planned obsolescence of Microsoft and Apple.
Update: The above test was made at home using a setup that simulated the situation at my mother’s apartment. But when I brought the DD-WRT router to her apartment, the performance was very poor, no doubt due to the fact that old WRT54GL router doesn’t support 5 GHz wi-fi. I now have a newer TP-Link Archer C8 v1 router running DD-WRT that should perform better.


